
You are using an out of date browser. It may not display this or other websites correctly.
You should upgrade or use an alternative browser.
You should upgrade or use an alternative browser.
rear upper control arm bushing removal
- Thread starter beerdog
- Start date
johnsons63
Registered
Anyone have any tips on replacing the rear upper control arm bushing? Based on some other posts it sounds like it can get tricky.
i wanna see also this tips so that i will have idea in the future if ever i will replace mine since you said it can get tricky.
")
i hope its not....
______________________________________________
If everything comes your way, you are in the wrong lane
i wanna see also this tips so that i will have idea in the future if ever i will replace mine since you said it can get tricky.
i hope its not....
______________________________________________
If everything comes your way, you are in the wrong lane
What's up with the link you keep putting into your quotes?
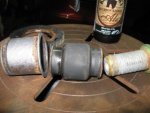
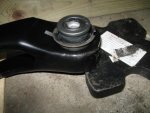
HEre is the bushing removed and disassembled. I did not know it was 3 pieces untill everything was removed. I just kept pressing out parts untill everything was out. The parts press into each other starting at the right. The white part is the inner CAmber CAM sleeve. next is the rubber bushing. Then the steel housing.
Attachments
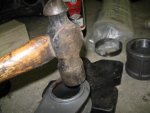
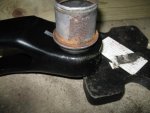
The innr parts press out easy. HArd part is getting the steel housing out. I thried with a shop press, but it started to bend the arm since everything presses out slowly. The arm has a good grip on the bushing housing.I found it very easy to pop it out with a hammer.Just a few sharp blows on the non-flanged side. It will not come out completly. You are just getting it started.
Attachments
Last edited:
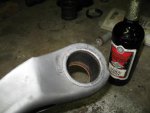
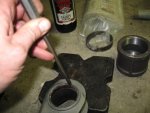
Installation is just the reverse, but save that old housing. It makes a perfect installation tool. The new bushing slips inup to this point. Then use the old housing and either hammer it in or use a press. I found it too hard with a hammer, but I read others have done it. To avoid bending the arm I jammed a few sockets in the arm arround the bushing for support. I forgot to take a picture of this. If I do this again I would fully box the arm before doing any dissasembly. That will be a project for another day.
Attachments
Not available anymore. They used to sell the whole arm with the bushing for about $85. After doing this that would make sense to me since the labor cost to replace the bushing probably exceeds the cost of the stamped arm. I got bushings from from Super Coupe for $35per. You can get them on other websites.
Mad1stGen
Registered
Not available anymore. They used to sell the whole arm with the bushing for about $85. After doing this that would make sense to me since the labor cost to replace the bushing probably exceeds the cost of the stamped arm. I got bushings from from Super Coupe for $35per. You can get them on other websites.
What brand is it ? Raybestos ? MOOG ? His price is $38 ?
I bought the Moog K8562 kit in the past, and it worked great.
Last edited:
$38 sounds right. I was going off memory. I relooked at the bushings on Rock Auto. They have some good pictures. After doing this the pictures make more sense. Looks like you can buy the bushing with or without the metal sleeve. With the sleeve is more expensive. When I was looking at these I did not understand why the pictures looked different. I assumed the ones without the metal sleeve were a cheaper version so I avoided them. It would definetly be an easier install and less cost without removing the sleeve. I wonder if there is an advantage to replacing the entire bushing instead only the internals? Don't know the SCP brand. I ordered some other stuff from him so just got everything at once.
What's with the beer in every one of your pictures?
I am the Beerdog!
Jeremi....I started this post becase I could not find any good or complete info on servicing these bushings. All I found was a post on another site that mentioned using a hammer to remove the sleeve. That person destroyed theirs using a press. I am glad you responded because I forgot about the "inferior looking" bushings. Hopefully this will save the next person some time and money. I would think the way to go would be to remove the internals and leave the metal sleeve. Then have the whole thing cleaned and powder coated or painted. Then buy the Moog or Reybestos internal part only. I would not be suprised if the Reybestos and Moog are the same item.
Mad1stGen
Registered
Hmm, after working on my donor car today for the white lightning project, I will not buy anything or have any work done by SCP, even it for the simple bushing.
SCP invoice was for over $12k, but the work is ****.
Did you notice any differences between the original and the replacement sleeves ?
I am building a complete rear IRS for this car, so definitely pcoat is in the plans. I guess I need to start a project thread
SCP invoice was for over $12k, but the work is ****.
Did you notice any differences between the original and the replacement sleeves ?
I am building a complete rear IRS for this car, so definitely pcoat is in the plans. I guess I need to start a project thread
Last edited: