You are using an out of date browser. It may not display this or other websites correctly.
You should upgrade or use an alternative browser.
You should upgrade or use an alternative browser.
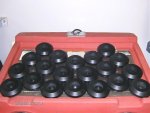
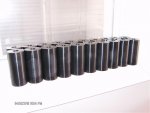
FS: Mark VIII IRS Sub-Frame Bushing Kits
- Thread starter DLF
- Start date
DLF
Registered
How many of those bolts are needed for 1 car?
4
I just bought 8 from 5 star. Max said he only saw 24 in Ford's warehouses.
Someone at Ford's secret parts monitoring headquarters just issued an Stage II alert.
Max is now under surveillance. LOL

Sierra3
Registered
Yes they are obsolete
Yes they are obsolete
The bolts are no longer available from FORD according to the dealership computer. I just bought 4 from Gary Smith FORD in FT Walton for 88.40. (They must have a 6.00 overcharge added to all thier invoices built into the computer billing program.) The salesman says its only at cost, but all he sees is whats on the screen, not his fault. Seems eveything i buy there is overpriced by exactly 6-9 dollars when compared to other online ordering.) I was kinda upset about getting over charged, but at least i got the bolts.
What stock is out there is all thats left. The bolt isnt that technical, im sure it can be sourced out at fastenal or other places in the future. I just paid for convience and not having to wait. For 20.00 per bolt they better be gold plated and install themselves, Jeeeese.
DLF
Registered
Anyone who is considering this, may want to purchase new bolts while they're still available from Ford.
From Tousley Ford:
N805747S100 $14.33 ea.
BOLT-M12X1.75X129.5
Max charged me 16.94 each. He said list was 26.06.
Hmm.....
DLF
Registered
Removal Instructions
Removal Instructions
JP, I'm going to ship your set Monday, along with the removal tool, for a test fit. I'll need the removal tool back as soon as possible.
To remove the stock bushings:
1. Remove the top hat.
2. Position the U shaped piece under the bushing to be removed.
3. Insert the threaded rod with nuts and washers and tighten the nuts (11/16") to remove. The bushing will just fall gently out of the bottom after a bit.
Attachments

DLF
Registered
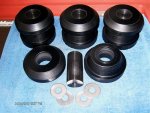
Installation Instructions
Installation Instructions
To install the new UHMW bushings:
1. Clean the sub-frame bushing mount holes.
2. Insert the upper bushing. You'll may need a dead blow hammer, it's an interference fit.
3. Tap in the sleeve from above, to just below the top surface of the upper bushing.
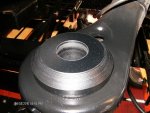
4. Place the 1 1/2" stainless steel washer on top of the sleeve.
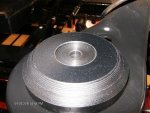
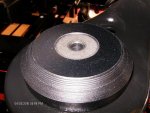
5. Press the lower bushing up from below until it stops. There should be a very small gap (see picture) between the top of the lower bushing and the sub-frame, that will disappear when the bolt is tightened.
6. Insert all 8 bolts loosely, using the stock sub-frame bracket (front) and cup (rear). 4 - sub-frame, 4 sub-frame brackets
7. Align the sub-frame using the alignment holes on each side near the back of the sub-frame. (I'll post some pictures of this when I re-install mine in a couple of days)
8. Tighten bolts as indicated.
Installation Instructions
To install the new UHMW bushings:
1. Clean the sub-frame bushing mount holes.
2. Insert the upper bushing. You'll may need a dead blow hammer, it's an interference fit.
3. Tap in the sleeve from above, to just below the top surface of the upper bushing.
4. Place the 1 1/2" stainless steel washer on top of the sleeve.
5. Press the lower bushing up from below until it stops. There should be a very small gap (see picture) between the top of the lower bushing and the sub-frame, that will disappear when the bolt is tightened.
6. Insert all 8 bolts loosely, using the stock sub-frame bracket (front) and cup (rear). 4 - sub-frame, 4 sub-frame brackets
7. Align the sub-frame using the alignment holes on each side near the back of the sub-frame. (I'll post some pictures of this when I re-install mine in a couple of days)
8. Tighten bolts as indicated.
Attachments
Last edited:
Thanks Doug.
I presume test fitting these in the spare IRS I have will tell us what we're looking for?
I'll get on it as soon as I can once I receive the parts and tool, but it may be the weekend before I can get time from work to do this hobby thing. I'll even take pics. But I'll get the tool back to you as quick as I can.
DLF
Registered
Thanks Doug.
I presume test fitting these in the spare IRS I have will tell us what we're looking for?
I'll get on it as soon as I can once I receive the parts and tool, but it may be the weekend before I can get time from work to do this hobby thing. I'll even take pics. But I'll get the tool back to you as quick as I can.
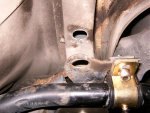
The only thing I need to know is if the gaps between the upper edges of the lower bushings are like the last pic I posted. I'm looking for something around 1/16".
In my sub-frame the two rear tapered holes are slightly (.050") smaller than the front two holes. I need to know if that's consistent in other sub-frames.
When I send your kit, the four upper bushings will be the same, but there will be two lowers tagged front and two lowers tagged rear.
You should receive everything Wednesday.
Weather permitting, I'll be track testing mine on the 10th.
The only thing I need to know is if the gaps between the upper edges of the lower bushings are like the last pic I posted. I'm looking for something around 1/16".
In my sub-frame the two rear tapered holes are slightly (.050") smaller than the front two holes. I need to know if that's consistent in other sub-frames.
Aye, Captain! We'll report back the results.

DLF
Registered
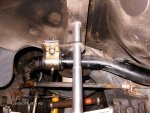
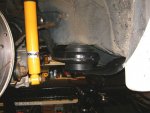
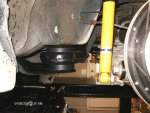
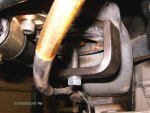
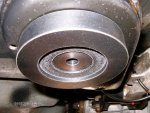
Sub-Frame alignment and installed pics.
On the left rear is a tab on the sub-frame that corresponds to a hole in the uni-body that is used to align the sub-frame during installation. Use a 3/4" pipe (or something similar, I made my own tool), and make sure that the pipe is vertical. Tighten the left rear mount and then go to the right rear of the sub-frame and use the alignment holes located there to complete the alignment. Then torque all four bolts.
On the left rear is a tab on the sub-frame that corresponds to a hole in the uni-body that is used to align the sub-frame during installation. Use a 3/4" pipe (or something similar, I made my own tool), and make sure that the pipe is vertical. Tighten the left rear mount and then go to the right rear of the sub-frame and use the alignment holes located there to complete the alignment. Then torque all four bolts.