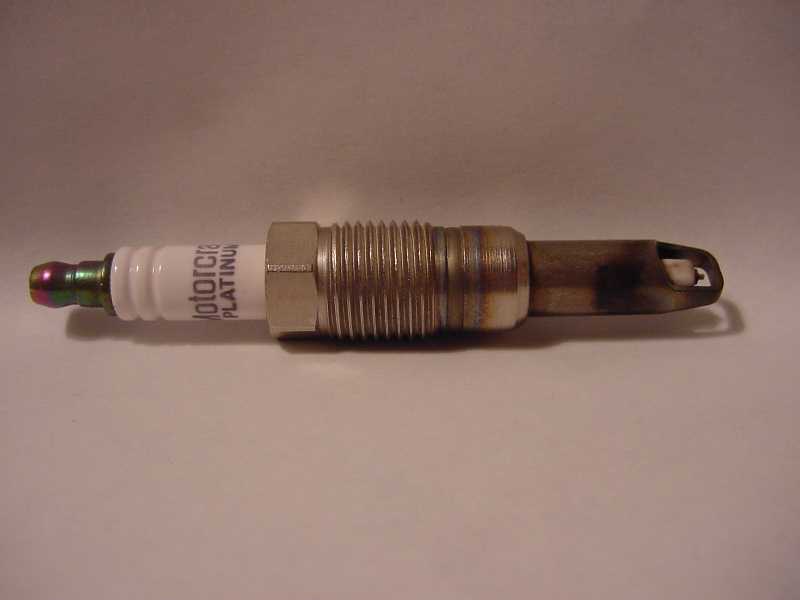
Those PZT 2Fs scare the &#>@ out of anyone that works on early production 3Vs. The long tubular business end siezes in the head, the weld breaks, and you end up winding only half the spark plug out of the engine. The leftover piece can't "fall off into the combustion chamber"; it's become bonded to the metal of the head!
This happens so commonly Ford issued a TSB detailing EXACT removal instructions to minimize breakage occurance.
Here's the copy'n'paste of TSB 06-05-09:
----------------------------------------------------------------------
"ISSUE:
Some 2004-2005 F-150 and 2005 F-Super Duty, Expedition, and Navigator vehicles with a 5.4L 3-valve engine may experience difficulty with spark plug removal which may cause damage to the spark plug and leave part of the spark plug in the cylinder head.
ACTION:
Refer to the following Service Procedure for techniques to remove the spark plugs.
SERVICE PROCEDURE
General Spark Plug Removal
To remove spark plugs without damage, it is necessary to adhere EXACTLY to this procedure before removal is attempted.
Make sure the engine is warm (hand touch after cooling down).
CAUTION: DO NOT REMOVE PLUGS WHEN THE ENGINE IS EXTREMELY HOT OR COLD SOAKED. THIS INCREASES THE CHANCE THE THREADS COULD BE DAMAGED.
CAUTION: BE SURE TO WEAR SAFETY GLASSES FOR STEP 2.
Remove the coil-on-plug assemblies and thoroughly blow out the spark plug wells and surrounding valve cover area with compressed air.
Back out the spark plugs, no more than 1/8 to 1/4 of a turn. Apply penetrating oil (AeroKroil or equivalent) and fill the spark plug well just above where the jamb nut hex sits. A minimum period of 5 to 10 minutes of soak time is required. The penetrating oil will wick down to the ground electrode shield in this time. DO NOT WORK the spark plug back and forth at this point.
CAUTION: EXCESSIVE PENETRANT, OR REPEATING THE PROCESS SEVERAL TIMES WITH TOO MUCH FLUID, COULD INTRODUCE ENOUGH LIQUID VOLUME TO HYDRO-LOCK THE ENGINE.
CAUTION: DO NOT USE AIR OR POWER TOOLS FOR PLUG REMOVAL. THE PLUG MUST ONLY BE REMOVED WITH HAND TOOLS.
Slowly turn the spark plug out. Some screeching and high effort may be noticed but, not in every case. The expected removal torque is about 33 lb-ft (45 N-m) but should decrease on the way out. If it is higher, try turning the spark plug back in a half turn, then back out again. If the turning torque still seems high, repeat the back and forth rotation along with some penetrating oil to reduce turning effort.
NOTE: ONCE THE SPARK PLUGS HAVE ALL BEEN REMOVED, NEW PLUGS SHOULD BE INSTALLED USING A FILM COATING OF MOTORCRAFT HIGH TEMPERATURE NICKEL ANTI-SEIZE LUBRICANT (XL-2) ON THE GROUND ELECTRODE SHIELD OF THE NEW SPARK PLUG (FIGURE 7). DO NOT COAT THE ELECTRODE STRAP OR THE PLUG WILL MISFIRE. THE NEW PLUGS SHOULD BE INSTALLED WITH NO LUBRICANT ON THE THREADS AND TORQUED TO SPECIFICATION, 25 LB-FT (34 N-m). "
-------------------------------------------------------------------------
If all of this still doesn't work and a plug breaks, a later issue of this TSB, and TSB 06-15-02, cover the use of Rotunda Special Service Tool # 303-1203 that's a special magic puller for getting the electrode tube out of the head!
One point must be clarified: PZT 2Fs WERE ONLY USED IN ENGINE ASSEMBLY. The replacement spark plug is PZT 1F, which has a slightly smaller diameter electrode tube and doesn't sieze in the head.
I've personally never seen anyone have problems with the 1Fs, but I still always use anti-sieze on the electrode tubes when installing them. (Be sure to read the last part of the TSB!)
If all this frightens anyone, get your factory 2Fs out while the mileage is low.
One last thing: the spark plug hex is smaller than usual. It's only 14mm. You must buy a specialty socket for these plugs.