
Has anyone done the conversion?. I'd like to know how difficult it is or isn't to do by myself in the garage. I have the parts and will be attempting to do this on Sunday. After its done, can I just unplug and discard the pump or do I have to pull the fuse and then take it out?. Thanks.
You are using an out of date browser. It may not display this or other websites correctly.
You should upgrade or use an alternative browser.
You should upgrade or use an alternative browser.
Doing coil conversion on Sunday, have some questions!
- Thread starter Destroyer
- Start date
Air suspension to coil spring conversion.What coil are you talking about? Are you in the correct forum for it?
Yes there are but I was hoping to find someone with some hands on experience to let me know if he/she had any troubles and what to watch out for.Dumb question, but is there not any instructions included with these coil conversion kits?
Destroyer....first off, everytime I see your name Static X's new song DESTROYER comes to mind, that song is BA.
Next......
The conversion is VERY simple. With a lift and my air tools I did a members car in about 1 1/2 hours.
First off...TURN OFF the air ride switch in the trunk.
Second....a little trick in releasing pressure in the air bags. Remove the metal clip, and than twist the solenoids counter clockwise?(look at the slots, you'll see) and the soleniod will POP down into the next slot, releasing ALL the air pressure. This may scare you and make sure you fingers are clear at the slot and at the bottom of the solenoid because it comes down quick")
When doing the front, you CAN remove/install the struts WITHOUT removing the upper or lower control arm bolts to the spindle. A lot of people just remove the upper control arm from the pindle to swing it out of the way, but if you loosen the upper strut bolts(13MM under the strut covers) on BOTH sides, the will take all pressure off of them. Once this is done, you can remove the lower strut bolt through the lower control arm, remove the air solenoid(or line, whichever you prefer), and than lift the strut back up into the strut tower high enough to get the end over the lower control arm and it drops right out. Now install the coil spring/strut assembly and only install the lower bolt, and just start the nut for now, don't tighten it. Next remove/install the other side. Once you've done both sides on the front you can just use a jack and lift at the bottom of the control arm to guide the strut up into the tower and line the 3 studs up at the top and finger tighten all 3 nuts. Do the same to the other side and than you're ready to tighten everything down and proceed to the back.
Now....if it becomes tough to remove the strut as I said, you can just remove the upper control arm bolt at the ball joint and swing it out of the way, but when I did it, I just pushed down on the spindle, while holding up the strut and I was able to swing the bottom of the strut over the control arm and out the bottom. The car was on a lift too, so make sure you have the front high enough to get it out the bottom.
Ok...onto the back. EASY. Place the jack stands on the rear CIRCLE subframe mounts NOT on the control arms or near by, you don't want any tension. Remove both lower shock bolts, this will allow the suspension to hang on the sway bar. Disconnect the factory bag, and remove. Using a pry bar(you may not have to) pry down on the lower control arm and slide the new coil spring in. Shouldn't have to use too much force. If it is a tight fit, remove the sway bar link on each side of the vehicle, just remove the TOP link nut so the sway bar will "swing" up and out of the way. This will give you even more slack to slide the springs in.
MAKE SURE you align both sides the same in relation to where the TOP/BOTTOM of the ends of the coils are. If you have them opposite, the car will sit higher on one side. This will be included in your instructions.
Anymore questions, let us know.
Off the top of my head you'll need....
*13MM DEEP socket for the upper strut nuts
*8MM socket for the Ign. Control Module(or wth it is) bracket on the drivers side strut tower, removal required to gain access to the strut nuts
13/16 Deep for the lower strut bolt with a 13/16 wrench to hold the nut/bolt
Pry Bar is handy
Small screwdriver to pry out the "clip" in the front struts holding the solenoid in place
Beer/Soda
Lunch, lol
For the back...
I think the shock nuts/bolts are 18 mm's? or 11/16.
11 or 12mm for the sway bar link nuts
pry bar again, lol my favorite tool!
Ok........after you're done, turn ON the air ride switch and cut this wire below, this will stop the "Check Air Suspension" warning from coming on....to gain access to it, I found the very EASIEST way was to remove the passenger side kick panel, lay on your back with a flash light and wire cutters and look up under the dash. You'll see a BLACK connector and a GRAY connector. The DARK GREEN wire with the LIGHT GREEN stripe.
CUT THE DARK GREEN w/LIGHT GREEN STRIPE WIRE THAT IS CONNECTED TO THE LIGHT GRAY CONNECTOR!!!! THIS IS TRUE FOR BOTH GEN 1'S and GEN 2'S!!!!
DO NOT CUT this wire....no matter what anyone tells you! Notice the dark green wire on the GRAY connector, right next to the orange wire...thats it. See below.
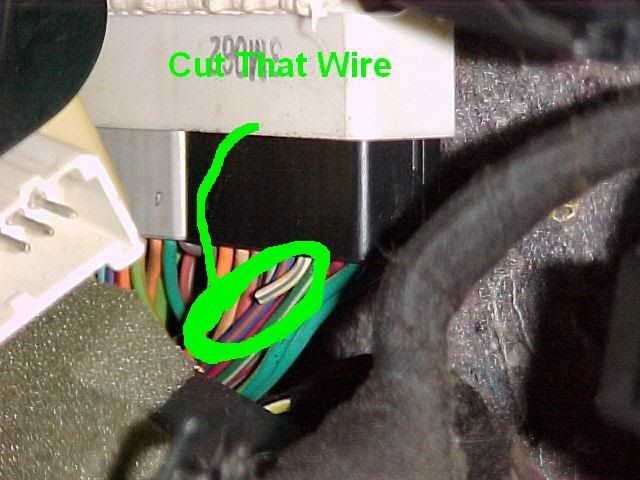
DO DO DO cut THIS wire. Notice the position on the gray connector....second position on the plug side towards the drivers side.
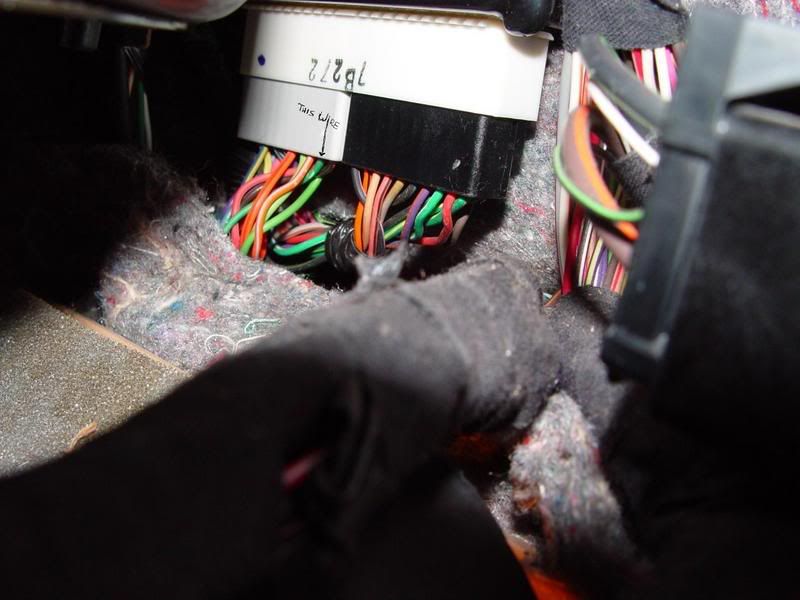
Both of these pictures were taken with the glove box OUT, but I assure you(I've done it TWICE NOW), that you can easily see the connectors/wiring from under the dash...its not that far up.
Now you're done...MAKE SURE you LEAVE the air ride switch ON. The compressor will not run...ever.
Oh....wear rubber gloves, you're girl won't appreciate the callast back massage later, or maybe you can convince her to give you one, lol.
BTW....I bought my car with the kit on it, but I removed and re-installed my coils 3 times to cut my springs to the heigth I wanted, so trust me...I got this down!
Did I forget anything?
Next......
The conversion is VERY simple. With a lift and my air tools I did a members car in about 1 1/2 hours.
First off...TURN OFF the air ride switch in the trunk.
Second....a little trick in releasing pressure in the air bags. Remove the metal clip, and than twist the solenoids counter clockwise?(look at the slots, you'll see) and the soleniod will POP down into the next slot, releasing ALL the air pressure. This may scare you and make sure you fingers are clear at the slot and at the bottom of the solenoid because it comes down quick
When doing the front, you CAN remove/install the struts WITHOUT removing the upper or lower control arm bolts to the spindle. A lot of people just remove the upper control arm from the pindle to swing it out of the way, but if you loosen the upper strut bolts(13MM under the strut covers) on BOTH sides, the will take all pressure off of them. Once this is done, you can remove the lower strut bolt through the lower control arm, remove the air solenoid(or line, whichever you prefer), and than lift the strut back up into the strut tower high enough to get the end over the lower control arm and it drops right out. Now install the coil spring/strut assembly and only install the lower bolt, and just start the nut for now, don't tighten it. Next remove/install the other side. Once you've done both sides on the front you can just use a jack and lift at the bottom of the control arm to guide the strut up into the tower and line the 3 studs up at the top and finger tighten all 3 nuts. Do the same to the other side and than you're ready to tighten everything down and proceed to the back.
Now....if it becomes tough to remove the strut as I said, you can just remove the upper control arm bolt at the ball joint and swing it out of the way, but when I did it, I just pushed down on the spindle, while holding up the strut and I was able to swing the bottom of the strut over the control arm and out the bottom. The car was on a lift too, so make sure you have the front high enough to get it out the bottom.
Ok...onto the back. EASY. Place the jack stands on the rear CIRCLE subframe mounts NOT on the control arms or near by, you don't want any tension. Remove both lower shock bolts, this will allow the suspension to hang on the sway bar. Disconnect the factory bag, and remove. Using a pry bar(you may not have to) pry down on the lower control arm and slide the new coil spring in. Shouldn't have to use too much force. If it is a tight fit, remove the sway bar link on each side of the vehicle, just remove the TOP link nut so the sway bar will "swing" up and out of the way. This will give you even more slack to slide the springs in.
MAKE SURE you align both sides the same in relation to where the TOP/BOTTOM of the ends of the coils are. If you have them opposite, the car will sit higher on one side. This will be included in your instructions.
Anymore questions, let us know.
Off the top of my head you'll need....
*13MM DEEP socket for the upper strut nuts
*8MM socket for the Ign. Control Module(or wth it is) bracket on the drivers side strut tower, removal required to gain access to the strut nuts
13/16 Deep for the lower strut bolt with a 13/16 wrench to hold the nut/bolt
Pry Bar is handy
Small screwdriver to pry out the "clip" in the front struts holding the solenoid in place
Beer/Soda
Lunch, lol
For the back...
I think the shock nuts/bolts are 18 mm's? or 11/16.
11 or 12mm for the sway bar link nuts
pry bar again, lol my favorite tool!
Ok........after you're done, turn ON the air ride switch and cut this wire below, this will stop the "Check Air Suspension" warning from coming on....to gain access to it, I found the very EASIEST way was to remove the passenger side kick panel, lay on your back with a flash light and wire cutters and look up under the dash. You'll see a BLACK connector and a GRAY connector. The DARK GREEN wire with the LIGHT GREEN stripe.
CUT THE DARK GREEN w/LIGHT GREEN STRIPE WIRE THAT IS CONNECTED TO THE LIGHT GRAY CONNECTOR!!!! THIS IS TRUE FOR BOTH GEN 1'S and GEN 2'S!!!!
DO NOT CUT this wire....no matter what anyone tells you! Notice the dark green wire on the GRAY connector, right next to the orange wire...thats it. See below.
DO DO DO cut THIS wire. Notice the position on the gray connector....second position on the plug side towards the drivers side.
Both of these pictures were taken with the glove box OUT, but I assure you(I've done it TWICE NOW), that you can easily see the connectors/wiring from under the dash...its not that far up.
Now you're done...MAKE SURE you LEAVE the air ride switch ON. The compressor will not run...ever.
Oh....wear rubber gloves, you're girl won't appreciate the callast back massage later, or maybe you can convince her to give you one, lol.
BTW....I bought my car with the kit on it, but I removed and re-installed my coils 3 times to cut my springs to the heigth I wanted, so trust me...I got this down!
Did I forget anything?
Last edited:
Yeah, I double that, Chiltons eat your heart out!Wow! Thanks for the detailed instructions. I'm helping Detroyer. Thanks for the info.:wave022:
Suspension is done, thanks for the help!. Rides great and no more loud compressor!!. Any idea how to get the air compressor out?. Figure I could put it on Ebay. Thanks again.Lol, thanks guys! Anything I can do to help! I have a bad habit of doing it right, if I'm going to do it at all, and then I go off on some tangent, haha.
Thanks again J. The pry bar did come in handy!
LOL I told you!
No problem, how'd things go? Did you have to remove the upper c. arm bolt or were you able to "squeeze" it out?Check out my other post "J's Land Shark" in members rides......I've been mod'n it since the day I got it, haha. First mod I performed was ripping out the sheep skin seat covers and steering wheel cover, LMAO.
As far as getting the compressor out...........
Remove the passenger side wheel, and fender lining(screws). Remove the air intake box on the top. Remove the air silencer bolts and THROW away the air silencer. Than you'll have access to the air compressor bracket.

What year is the car? The reason I ask is you should do the air silencer removal at the same time.........
Last edited:
Its a 95. The airbags came out fine. We had to remove the upper arm to get the coil over in. Why don't they mark the parts as driver side or passenger side? Left front could be 2 sides, pending if your looking at the car or sitting in the car. We had to destroy the top tabs on the rears. I've got a kink in my neck after cutting that wire under the dash. Its hard to get your head up there to see. That pic really helped.
Its a 95. We had to remove the upper arm to get the coil over in.
Its hard to get your head up there to see. That pic really helped.
Hey....I guess you can't have everything, haha. Atleast I prepared you guys for it right?
Glad you found the wire.....makes things REAL easy when you've been in those shoes. When I tried to find out which wire to cut, it was like finding out everyones vote for the next president. "Cut this....no cut this one....no this one" OMG what a head ache.....I tried that first one because as soon as everyone saw the picture, they were like "yeah that one"......NOT. After I studied the wiring schematic it made more sense to cut the other one, and after trial and error, I stand by the dark green w/light green
Drivers side of the car LEFT
Passenger side of the car RIGHT
Post some pics of that badass Mach 1 for everyone to enjoy. It does have a Lincoln motor in it afterall.Yep, she done. Good stance and a nice ride. Glad its not mine. I'm a MOD junky. I'd be doing every available mod there is to this car. I've got about 14k in mods on my 04 Mach 1. Destroyer can vouch for that. Thanks again J. The pry bar did come in handy!
You guys got me there. Mach's are still going for close to what I paid for it. I could get a 3 year old lincoln for half the price of original sticker. Plus If I posted it, I'd have a bunch of Lincoln guys going to the Mach 1 sight posting there thinking of an upgrade. JK!
Mach's are still going for close to what I paid for it. I could get a 3 year old lincoln for half the price of original sticker. Plus If I posted it, I'd have a bunch of Lincoln guys going to the Mach 1 sight posting there thinking of an upgrade. JK!
Last edited:
BlackIceLSC
Registered
I simplified it for anyone else who might need it in the future...pics and all!
http://www.cardomain.com/ride/850999
http://www.cardomain.com/ride/850999