
You are using an out of date browser. It may not display this or other websites correctly.
You should upgrade or use an alternative browser.
You should upgrade or use an alternative browser.
how to clean steering column potentiometer
- Thread starter beerdog
- Start date
So I took the risk and pried open the potentiometer. I can see what people are talking about. Both sliding contact points were dirty. The only question is they are also lubricated with a grease. When you clean them you remove the grease. Any suggestions on what type I should use to relube it? Should it be relubed? The grease is brown or amber colored.
Do NOT use dielectric grease! It's non-conductive and shouldn't be used directly on electrical contacts. I'm not even sure contact cleaner is a good idea after reading up a little more on it. In fact some people recommend only using distilled water to clean them. Do a search on "cleaning faders" and you'll see a lot of different opinions.
An interesting thread here is a place to start:
http://www.prodigy-pro.com/diy/index.php?topic=21150.0
Someone mentioned this stuff:
http://www.amazon.com/DeoxIT®-Fader..._4?ie=UTF8&s=automotive&qid=1308235892&sr=8-4
An interesting thread here is a place to start:
http://www.prodigy-pro.com/diy/index.php?topic=21150.0
Someone mentioned this stuff:
http://www.amazon.com/DeoxIT®-Fader..._4?ie=UTF8&s=automotive&qid=1308235892&sr=8-4
Last edited:
Do NOT use dielectric grease! It's non-conductive and shouldn't be used directly on electrical contacts.
 that is where i use dielectric grease, on conductive contacts, like the plug boot to the top of the spark plug, light bulb sockets, etc.
Just buy IPA that is better than 70%..... 30% is WATER!!!
i saw on TV where companies now use a citrus based solvent to clean IC boards, contacts, etc, you can make lemon-aid with it
I will post some pics. This is the large black plastic housing attached in the steering column. Not the clock sping circuit board housing. One of the conenctors on the underside of the column attach to it. I think the one on the right side of the housing. There are 2 sliding pots in it. One for in/out and a second smaller one (i assume) for the tilt. The grease that was on the pots was the same grease applied to the connector in the same manner as dielectric grease. I would have guesed it was a dielectric grease, but it is an amber color. I will stop at the dealer or call Max to see if they know of this grease. When I cleaned it you could tell the grease was factory applied but there was either dust or worn pot particles mixed in with it.
This is the original ( as fas as I know) column from our red car. The primary problem I am fixing is the broken bearing issue. Since it is apart I figured I would give the potentiometer a cleaning.
Mark, the spring compressor works good, although I have no idea why the head has that funky pocket. It does not seem to fit anything. It has the right part number, but maybe it is originally intended for a different column. You also have to have the column almost fully extended to remove the spring. The process to disassemble it only takes 15 minutes. Still need to remove the broken pin and install a new one.
Well, I have worked in electronics manufacturing for the last 10 years at Motorola. My group makes the high end 2-way radios, accesories, infrastructure, used by the police, miltary, and fireman. IPA with a brush or special IPA applicator is pretty much the universal solvent used at a bench to clean everything. Other chemicals are used to clean circuit boards prior to use or when they are made. You would not use IPA for bulk cleaning.
... You would not use IPA for bulk cleaning.
or drinking, unless maybe if you are Joe
Here is a description of dielectric grease i found .
Dielectric greaseDielectric grease is a nonconductive grease. As such, it does not enhance the flow of electrical current. Thus electrical conductors should not be coated with dielectric grease prior to being mated. Dielectric grease is, however, often applied to electrical connectors, particularly those containing rubber gaskets, as a means of lubricating and sealing rubber portions of the connector.
""The widest use of dielectric grease is in high-voltage connections associated with spark plugs. The grease is applied to the rubber boot of the plug wire. This helps the rubber boot slide onto the ceramic insulator of the plug. The grease also acts to seal the rubber boot, while at the same time preventing the rubber from becoming stuck to the ceramic. Generally spark plugs are located in areas of high temperature, and the grease is formulated to withstand the temperature range expected.
Another common use of dielectric grease is on the rubber mating surfaces or gaskets of multi-pin electrical connectors used in automotive and marine engines. The grease again acts as a lubricant and a sealant on the nonconductive mating surfaces of the connector. It is not recommended to be applied to the actual electrical conductive contacts of the connector because it could interfere with the electrical signals passing through the connector.""
Some more searching leads me to believe the grease I see is "electrical contact grease" most descriptions I find of this is that it is a conductive mineral based amber colored greased used to prevent corosion and improve electrical connections. The stuff Mark shows is not a grease, although the same company sells mineral based electrical contact grease that is amber colored. The also sell the fader lube in a grease form. Turns out it is pretty common. Thanks makr for pointing me in the right direction.
Last edited:
That was new info to me. I always thought the stuff was conductive.
i knew it was an insulator but did not know you should should avoid getting it on the conductors.
Ok....I just completed the steering column although I have not installed it yet.
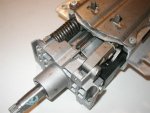
The item you are trying to clean is the black plastic box on the lower right of the firts pic. There are 2 sliding contact on a circuit board. You cannot see the whole potentiometer int he pic. Also, it cannot be removed without disassembling the column.
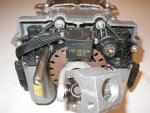
First step is to remove the steering column speed/position sensor. This is black box in the middle of the lower pic. Just 2 torx screws
Next you have to remove the 2 motors. Just 2 torx screws for each moto. They slide off the hex shafts. They may stick a little. Just pull them or carefully pry them. I forgot to take a pic of the motors after removed. I will be doing this again. So I will take them then.
The item you are trying to clean is the black plastic box on the lower right of the firts pic. There are 2 sliding contact on a circuit board. You cannot see the whole potentiometer int he pic. Also, it cannot be removed without disassembling the column.
First step is to remove the steering column speed/position sensor. This is black box in the middle of the lower pic. Just 2 torx screws
Next you have to remove the 2 motors. Just 2 torx screws for each moto. They slide off the hex shafts. They may stick a little. Just pull them or carefully pry them. I forgot to take a pic of the motors after removed. I will be doing this again. So I will take them then.
Attachments
Last edited: