The message center keyboard functions on a lot of 93-96 Mark VIII's will at times fail to recognize certain key presses. The problem seems to be more common as the car ages. I recently dealt with this particular issue and decided to try my luck at fixing the problem.
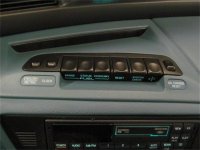
The entire control assembly is easily removed by carefully prying up on the outside front corners of the assembly with a trim tool. Once the front comes up you can pivot it up and out. There will be two harness connections to unhook to remove the assembly from the dash.
Once removed you can flip it over and remove the keypad itself by removing 4 screws with a 6mm socket.
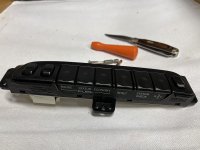
The keypad can be further disassembled by removing one phillips head screw on the back and carefully releasing four plastic latches along each side.
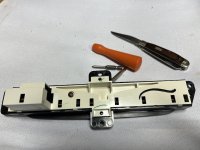
Once separated, the guts reveal a printed circuit board with miniature push button PCB mounted switches.
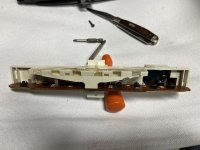
You have to remove the keypad illumination lamp bulb to be able to remove the printed circuit board. Simply twist one-quarter turn counter-clockwise to remove the bulb.
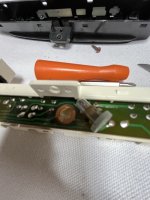
You now have access to the printed circuit board with the switches.
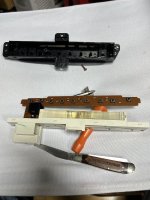
If you look carefully, there are two rows of switches. The first two switches at the end with the harness connection and the last switch on the opposite end align with the keypad switches for "English/Metric", "Clock" and the "Oil Change Reset" buttons.
The inner six switches are aligned with the piano key switch buttons for the FUEL "Range", "Status" and "Economy" buttons along with the "Reset", "System Check" and "N/S/E/W" compass buttons.
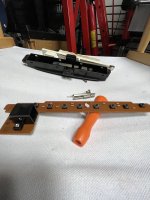
The switches appear to be 4 pin microswitches, likely double-pole/double throw switches. You can follow the PCB traces and connections along the back side of the board to decipher the connections to the 8 pin harness connector. It appears the keypad switches make or break certain resistance values which are decoded by the message center as keypresses.
My assumption is the internal contacts age with oxidation and become non-conductive thus not functioning to complete the circuit(s) as required when the buttons are pressed. The keypad itself is a simple mechanical plastic lever assembly which has an arm which simply depresses the associated miniature button switches on the circuit board.
The switches are enclosed assemblies that you can press with your finger and feel the internal click, similar to keystrokes on a mechanical computer keyboard.
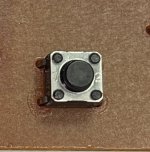
Since the contacts are enclosed, manual cleaning of the contacts is not possible. I used a chemical contact cleaner, specifically
CRC brand QD Electronic Cleaner.

I did not spray the assembly directly, what I did was to spray some of the liquid into the cap and used the nozzle straw to dip into the liquid and then deposit a drop or so onto the button of each switch and then rapidly depressed the switch multiple times (20-30) so as to allow the cleaner to penetrate the assembly and hopefully detoxify the contacts. Since it evaporates within minutes, by the time I treated the last switch, the first switch was dry, so I repeated the process twice more for a total of three applications each.
I then left the assembly thoroughly dry overnight and the next day carefully reassembled everything and reinstalled it in the car.
Success! While perhaps not absolutely 100%, it still misses a keypress every now and then, but the keypad is responsive and operational now. I was finally able to reset the clock and cycled each function to check everything out and I am happy with the results.

The entire control assembly is easily removed by carefully prying up on the outside front corners of the assembly with a trim tool. Once the front comes up you can pivot it up and out. There will be two harness connections to unhook to remove the assembly from the dash.
Once removed you can flip it over and remove the keypad itself by removing 4 screws with a 6mm socket.

The keypad can be further disassembled by removing one phillips head screw on the back and carefully releasing four plastic latches along each side.

Once separated, the guts reveal a printed circuit board with miniature push button PCB mounted switches.

You have to remove the keypad illumination lamp bulb to be able to remove the printed circuit board. Simply twist one-quarter turn counter-clockwise to remove the bulb.

You now have access to the printed circuit board with the switches.

If you look carefully, there are two rows of switches. The first two switches at the end with the harness connection and the last switch on the opposite end align with the keypad switches for "English/Metric", "Clock" and the "Oil Change Reset" buttons.
The inner six switches are aligned with the piano key switch buttons for the FUEL "Range", "Status" and "Economy" buttons along with the "Reset", "System Check" and "N/S/E/W" compass buttons.

The switches appear to be 4 pin microswitches, likely double-pole/double throw switches. You can follow the PCB traces and connections along the back side of the board to decipher the connections to the 8 pin harness connector. It appears the keypad switches make or break certain resistance values which are decoded by the message center as keypresses.
My assumption is the internal contacts age with oxidation and become non-conductive thus not functioning to complete the circuit(s) as required when the buttons are pressed. The keypad itself is a simple mechanical plastic lever assembly which has an arm which simply depresses the associated miniature button switches on the circuit board.
The switches are enclosed assemblies that you can press with your finger and feel the internal click, similar to keystrokes on a mechanical computer keyboard.

Since the contacts are enclosed, manual cleaning of the contacts is not possible. I used a chemical contact cleaner, specifically
CRC brand QD Electronic Cleaner.

I did not spray the assembly directly, what I did was to spray some of the liquid into the cap and used the nozzle straw to dip into the liquid and then deposit a drop or so onto the button of each switch and then rapidly depressed the switch multiple times (20-30) so as to allow the cleaner to penetrate the assembly and hopefully detoxify the contacts. Since it evaporates within minutes, by the time I treated the last switch, the first switch was dry, so I repeated the process twice more for a total of three applications each.
I then left the assembly thoroughly dry overnight and the next day carefully reassembled everything and reinstalled it in the car.
Success! While perhaps not absolutely 100%, it still misses a keypress every now and then, but the keypad is responsive and operational now. I was finally able to reset the clock and cycled each function to check everything out and I am happy with the results.
Last edited:

