So the factory sub in my 1999 Town Car Signature has been blown since I got the car. It was annoying, but since it was cold out, I opted to live with it.
If you are suspicious that yours is doing the same, listen to some music and if you hear "tppth tppth tppth" with the beat, instead of "thump thump thump." Something is amiss.
To confirm it is the sub, just fade the stereo all the way to the front. If the bad noise is still behind you, it's the sub. It may be worth noting that mine was most annoying at lower volumes..
So today, I tore into it.
Although the sub is readily visible from the trunk, it is secured to the package tray from above, which means the back seat has to come out to get to it.
This is really simpler than it sounds. Find yourself an 11mm deep socket, and an 18mm deep socket, your longest-handled ratchet, and set them aside for now.
The "seat" of the back seat can be removed by climbing into the foot-well, pushing the front edge firmly toward the rear of the car, and lifting up. There's a clip on both sides, so you'll have to do this twice. Once those are released, just lift the front edge up, and the whole thing comes out. Easy breezy.
To remove the back rest, you'll need that 18mm socket. The two outer-most seat-belt nuts have to come out, as the backrest is secured beneath them. Grab the back-rest from beneath, and pull firmly up. There are three "hooks" behind it at the top that hold it in place. Once released, you'll need to slide it out from behind the center occupant's shoulder strap, but it will come right out.
This is a great time to clean under the back seat and look for change, treasures and/or petrified fast food items.
To remove the rear package tray "carpet," there are two plastic push pins along the front edge that have to come out, and the center seat-belt needs to be threaded through the slot provided. Just pull the whole thing toward you, and it should slide out. Keep an eye on the hooks for the speaker grilles, as they seem prone to hanging up on the speakers. Also in my case, a bit of the adhesive used at the factory on the back window was stuck to the carpet near the brake light. I was able to free this by just poking it with my fingers as I pulled.
The brake light itself does not have to be removed, as the "carpet." it is cut to fit around it.
At this point, the speaker for the subwoofer is accessible. If you plan to simply replace it with a new 6" speaker, you can actually remove it without going through the complexities below. It is secured by four Phillips screws, just inside the perimeter of the foam "circle" glued on top of the speaker. They can be removed without removing the foam if you are careful. The wires are attached to the speaker with regular (but differently sized) blade connectors.
If you however don't have a 6" speaker handy, or maybe have bigger plans, keep reading.
Here's the only part where it gets a little tricky. You'll now see that the whole back seat and package tray is covered with a black rubber mat. That mat is held in place up top with two plastic push-pins that are easy to see and remove, but it also fits underneath (and around) the brake light.
To free this, gently lift up on the back two corners of the light. They are secured by tabs that fit into slots in the package tray. You will not be able to remove the entire fixture; it seems that it gets installed before the window glass. I did find that I was able to lift the tabs just enough to slide the rubber out from beneath it, one side at a time.
Once the mat is out of the way, you'll see the antenna amplifier, the speaker wires, and the three 11mm bolts for the subwoofer. Remove two of the three bolts for the subwoofer, and then ask yourself. "Did I disconnect the wire to the sub from the amplifier inside the trunk?" because the answer will be "no," go do that. It unplugs easily from the amp, and it is the only wire in the harness. There's also one clip to release to free the wire up entirely.
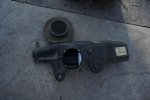
Now you can unscrew that last nut, and support the sub from underneath while doing so.
Ta-da!
If you are suspicious that yours is doing the same, listen to some music and if you hear "tppth tppth tppth" with the beat, instead of "thump thump thump." Something is amiss.
To confirm it is the sub, just fade the stereo all the way to the front. If the bad noise is still behind you, it's the sub. It may be worth noting that mine was most annoying at lower volumes..
So today, I tore into it.
Although the sub is readily visible from the trunk, it is secured to the package tray from above, which means the back seat has to come out to get to it.
This is really simpler than it sounds. Find yourself an 11mm deep socket, and an 18mm deep socket, your longest-handled ratchet, and set them aside for now.
The "seat" of the back seat can be removed by climbing into the foot-well, pushing the front edge firmly toward the rear of the car, and lifting up. There's a clip on both sides, so you'll have to do this twice. Once those are released, just lift the front edge up, and the whole thing comes out. Easy breezy.
To remove the back rest, you'll need that 18mm socket. The two outer-most seat-belt nuts have to come out, as the backrest is secured beneath them. Grab the back-rest from beneath, and pull firmly up. There are three "hooks" behind it at the top that hold it in place. Once released, you'll need to slide it out from behind the center occupant's shoulder strap, but it will come right out.
This is a great time to clean under the back seat and look for change, treasures and/or petrified fast food items.
To remove the rear package tray "carpet," there are two plastic push pins along the front edge that have to come out, and the center seat-belt needs to be threaded through the slot provided. Just pull the whole thing toward you, and it should slide out. Keep an eye on the hooks for the speaker grilles, as they seem prone to hanging up on the speakers. Also in my case, a bit of the adhesive used at the factory on the back window was stuck to the carpet near the brake light. I was able to free this by just poking it with my fingers as I pulled.
The brake light itself does not have to be removed, as the "carpet." it is cut to fit around it.
At this point, the speaker for the subwoofer is accessible. If you plan to simply replace it with a new 6" speaker, you can actually remove it without going through the complexities below. It is secured by four Phillips screws, just inside the perimeter of the foam "circle" glued on top of the speaker. They can be removed without removing the foam if you are careful. The wires are attached to the speaker with regular (but differently sized) blade connectors.
If you however don't have a 6" speaker handy, or maybe have bigger plans, keep reading.
Here's the only part where it gets a little tricky. You'll now see that the whole back seat and package tray is covered with a black rubber mat. That mat is held in place up top with two plastic push-pins that are easy to see and remove, but it also fits underneath (and around) the brake light.
To free this, gently lift up on the back two corners of the light. They are secured by tabs that fit into slots in the package tray. You will not be able to remove the entire fixture; it seems that it gets installed before the window glass. I did find that I was able to lift the tabs just enough to slide the rubber out from beneath it, one side at a time.
Once the mat is out of the way, you'll see the antenna amplifier, the speaker wires, and the three 11mm bolts for the subwoofer. Remove two of the three bolts for the subwoofer, and then ask yourself. "Did I disconnect the wire to the sub from the amplifier inside the trunk?" because the answer will be "no," go do that. It unplugs easily from the amp, and it is the only wire in the harness. There's also one clip to release to free the wire up entirely.
Now you can unscrew that last nut, and support the sub from underneath while doing so.
Ta-da!