Gen 2 HID Aftermarket Upgrade

DLF

Registered
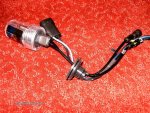
I ordered this 4300K VVME slim ballast 9005 HID kit via eBay on 12/23. Got it today, 5 days later.

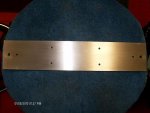
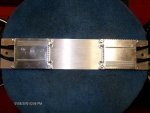
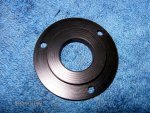
To install aftermarket HID bulbs into a Gen 2 housing, an adapter is required, so I designed and made a pair from Delrin (and since I had the lathe and drill press setup, I also made an extra pair, if anyone's interested look HERE :wink:). The hole in the housing is just slightly larger than a 9005 bulb base, but with the adapter, it's nice and secure. :cool:

NOTE: I caution anyone that tries to do this themselves, that the studs on the housing are NOT equally spaced.

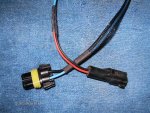
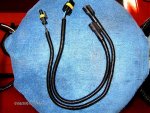
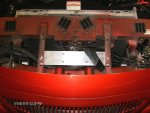
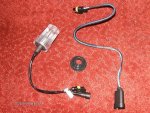
I seperated the bulb and ballast wiring from the attached grommet.

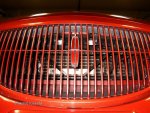
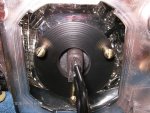
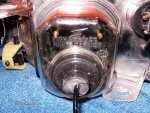
I then installed 9005 HID bulb into the housing using my adapter and the OEM hardware.

Then I reinstalled the OEM square cover with the grommet removed earlier and sealed it with RTV.

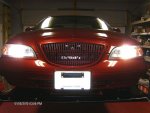
I'm going to wait overnight for the RTV to harden, and then I'll wire the ballast power lead into the stock wiring where the OEM ballasts plug in and finish the installation.

Finished pics tomorrow night. :D
 

Attachments

  • HPIM1025s.jpg
    HPIM1025s.jpg
    129.8 KB · Views: 0
  • HPIM1023s.jpg
    HPIM1023s.jpg
    99.4 KB · Views: 0
  • HPIM1029s.jpg
    HPIM1029s.jpg
    155.5 KB · Views: 0
  • HPIM1032s.jpg
    HPIM1032s.jpg
    144.8 KB · Views: 0
  • HPIM1026s.jpg
    HPIM1026s.jpg
    125.5 KB · Views: 0
Last edited:
Hope you left some slack wire inside the housing so you can take it apart if you need to..... like to replace the bulb if it blows.
 
Are those the original HID housings, or the new non-HID housings?

:D -J

The original HID housings. I don't think you'd need an adapter with the Halogen housing, but then the reflector probably wouldn't be optimized for the HID bulb.
 
The original HID housings. I don't think you'd need an adapter with the Halogen housing, but then the reflector probably wouldn't be optimized for the HID bulb.

I've thought about this a little, don't good aftermarket HID bulbs place the arc in the same place as the filament of the bulbs they are replacing?

:D -J
 
aftermarket bulbs in the stock housings will shine the light just fine, i dont know why some insist on re-inventing the wheel, the point i try to make is, the stock bulbs cant be bought anymore new, used ones are just that, used, who knows what kind of life is left on one, and do you want to spend $125 bucks to get a month out of one? aftermarkets are cheap, they work, and you can have your headlights back, the aftermarket lights fit in the same little 1 inch hole in the housing that the stock bulb does, so in my eyes, the bulb is in the same spot!!
 
aftermarket bulbs in the stock housings will shine the light just fine, i dont know why some insist on re-inventing the wheel, the point i try to make is, the stock bulbs cant be bought anymore new, used ones are just that, used, who knows what kind of life is left on one, and do you want to spend $125 bucks to get a month out of one? aftermarkets are cheap, they work, and you can have your headlights back, the aftermarket lights fit in the same little 1 inch hole in the housing that the stock bulb does, so in my eyes, the bulb is in the same spot!!

Ok, but what if my housings are craptastic looking (there not) and I want the new clear beautiful housings...

Will an aftermarket setup still work as well?

:D -J
 
I've thought about this a little, don't good aftermarket HID bulbs place the arc in the same place as the filament of the bulbs they are replacing?

:D -J

Yes...all of the manufacturers are moving to making the reflector have all of the complex geometries and the lens be plain and flat...for HID AND halogen lighting. In other words, HID and halogen lighting is independant of whether the lens is plain or has all of the parabolic curves in it. It is merely coincidence that Lincoln decided to change both at the same time.
 
Last edited:
Ok, but what if my housings are craptastic looking (there not) and I want the new clear beautiful housings...

Will an aftermarket setup still work as well?

:D -J


It is not a difficult job to clean those crappy housing..... In an hour, both can be cleaned and polished to be clear....I know, I HAD the craptastic lenses.
 
No, I didn't...I used my battery powered drill with a pad on it..... used Meguires PlastX plastic cleaner/polish and run it on slow speed until clear. If it's REALLY bad, then remove them and sand with 1000 then 1500 grit wet/dry sandpaper and then do the above. They will look brand new!
 
No, I didn't...I used my battery powered drill with a pad on it..... used Meguires PlastX plastic cleaner/polish and run it on slow speed until clear. If it's REALLY bad, then remove them and sand with 1000 then 1500 grit wet/dry sandpaper and then do the above. They will look brand new!

I did the thing with the pad, drill and polish, and that did not help much. They are pitted bad, i guess i have go sandpaper route.
 
Just in case anyone was wondering where the "finished" pics were..... I've come up with a slick way to mount the new ballasts, but I had to order a piece of aluminum plate to make it. So, once I get that, I'll complete the installation. :)
 
Finished Pics

Finished Pics

Completed the install today, after I finally got the 3/16" x 2 1/2" aluminum bar that I had ordered.

Cut the stock connectors from the original ballasts and made up a couple of wiring harnesses to connect the new ballasts to the stock plugs at the bottom of the radiator core.

Cut a 12 1/2" long piece of the aluminum bar and drilled 5/32" holes to match the mounting holes on the ballasts. Riveted the ballasts to the aluminum bar and mounted to the car using 6mm stainless steel button head bolts, washers, and nyloc nuts.
 

Attachments

  • HPIM1034s.jpg
    HPIM1034s.jpg
    143.8 KB · Views: 0
  • HPIM1038s.jpg
    HPIM1038s.jpg
    153.9 KB · Views: 0
  • HPIM1039s.jpg
    HPIM1039s.jpg
    64.4 KB · Views: 0
  • HPIM1040s.jpg
    HPIM1040s.jpg
    79.1 KB · Views: 0
  • HPIM1041s.jpg
    HPIM1041s.jpg
    65.9 KB · Views: 0
More Pics

More Pics

As you can see, this puts the ballasts in the air flow and the aluminum will also act as a heat sink.
 

Attachments

  • HPIM1045s.jpg
    HPIM1045s.jpg
    63.5 KB · Views: 0
  • HPIM1048s.jpg
    HPIM1048s.jpg
    101.4 KB · Views: 0
  • HPIM1047s.jpg
    HPIM1047s.jpg
    54.3 KB · Views: 0
Back
Top