Yes Kevin, you have to remove the wipers, than the plastic top portion of the wiper cowl(should be phillips screws somewhere) and than you'll need to remove the wiper arm from the motor, than the motor. A pain because of the confines of its location, but doable.
Heres what AllData says......
Turn ignition switch to RUN position. Turn on windshield wipers, cycle to mid-wipe position, then turn off ignition.
Disconnect battery ground cable.
Remove left and righthand wiper arms.
Remove cowl top to hood seal.
Remove left and righthand cowl vent screens.
Remove four retaining screws and washers, then the cowl top extension.
Disconnect two wiring connectors from motor.
Remove retaining bolts and washer assemblies from wiper module.
Lift module slightly to disengage support bracket from dash panel mounting stud. Move module sideways about 2 in toward passenger side, and remove module from vehicle.
Disconnect linkage drive arm from motor crankpin after removing clip.
Remove three retaining screws and remove motor from module.
Reverse procedure to install. Before installing blade and arm assemblies to pivot shafts, cycle motor and turn wiper switch OFF to ensure wiper linkage is in PARK position.
Here's a tech service bulletin too....
ISSUE
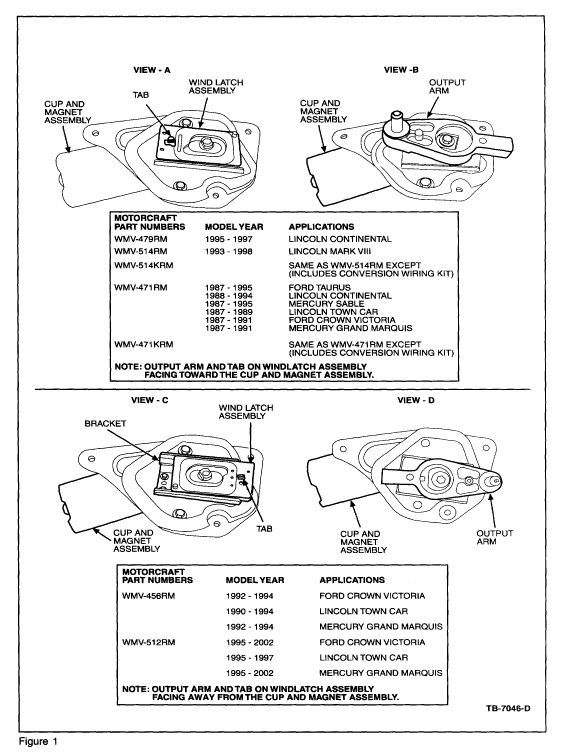
Motorcraft remanufactured front wiper motors do not include the mounting bracket or depressed park output arm. The mounting bracket and depressed park output arm must be transferred from the old wiper motor to the replacement wiper motor. Care must be taken to ensure proper orientation of the windlatch assembly and depressed park output arm.
ACTION
The front wiper motor mounting bracket and output arm must be removed from the old front wiper motor and installed on the remanufactured wiper motor if wiper motor replacement is required. Refer to the following service information for details.
SERVICE PROCEDURE
Disassembly:
1. Using a small flat bladed screwdriver, carefully remove the plastic output arm dust cover from the old wiper motor output arm to expose the output arm hold down bolt.
NOTE THE DUST COVER WILL BE REINSTALLED DURING ASSEMBLY.
2. Remove the output arm attaching bolt.
3. Using a small light hammer, gently tap the backside of the output arm to remove the output arm from the wiper motor output shaft.
Carefully observe the orientation of the plastic windlatch slide.
NOTE TAKE CARE NOT TO DAMAGE THE PLASTIC WINDLATCH SLIDE OR BRACKET. IT IS NOT NECESSARY TO REMOVE THE PLASTIC WINDLATCH SLIDE OR METAL GUIDE FROM THE WIPER MOTOR MOUNTING BRACKET.
4. Remove the three (3) 8 mm wiper motor mounting bracket attaching bolts.
5. Remove the wiper motor bracket.
Assembly:
1. Position and align the old wiper motor mounting bracket onto the new wiper motor.
2. Reinstall the three wiper motor mounting bracket bolts and torque to 108-156 Lb-in. (13-17 N.m).
3. Verify that the plastic windlatch slide is positioned so that it can move an equal distance beyond both ends of the depressed park windlatch guide bracket. Make sure the tab on the windlatch is oriented in the proper direction for the specific application (Figure 1, views A and C).
4. Apply a thin film of Silicone Brake Caliper Grease (Motorcraft Part XG-3-A) to the mating surfaces of the plastic windlatch slide and the output arm.
5. Install the output arm onto the wiper motor output shaft according to the specific application (Figure 1, views B and D).
NOTE THE OUTPUT SHAFT AND ARM ARE KEYED FOR PROPER ORIENTATION.
6. Reinstall the output arm bolt and torque to 132-180 Lb-in. (15-20 N.m).
7. Reinstall the plastic output arm dust cover.
8. Rotate the output arm slowly clockwise one full turn by hand, then turn the output arm by hand counter-clockwise to seat the detent in the output arm against the stop on the plastic windlatch slide.
9. Position the vehicle wiper arm linkage so that the wiper blades are at the bottom of the windshield, just above the parked position.
10. Install the wiper motor in the vehicle and connect the wiper arm linkage per the procedures outlined in Section 01-16 or Section 501-16 Wiper and Washer Systems - Removal and Installation, of the appropriate model year Workshop Manual.


