Headlights

ranchodenieve

New member
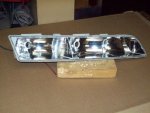
I was trying to adjust my headlight aim tonight since they appeared to be aimed way too low. The low beams were like no lights at all and the high beams lit up the road like low beams. I was using the classic technique of looking for the top of the beam at 25 feet, but the low beams were too diffuse to show a top of the beam at any setting. Meanwhile the brights were blastingly bright with the 6000 lumen LEDs that I installed in both sets of lights. The high beams were set perfect and work really well, but the lows are still icky. Upon inspection of the lit reflectors, I discovered why. The high beams have a smooth reflective surface inside that properly focuses the beam. The low beams do not. They seem to have lines inside that diffuse rather than focus the beam. As a consequence they have a very dim output. Both do have the shiny surface intact.
Is it possible to take the lamps apart to install a proper unbroken shiny surface into the low beams. It does not look like it from the eBay images of these lights. Are there other years that don't have this issue that I can install? I'd prefer to avoid HIDs if possible since the LEDs do have more light output and are easier to deal with. Or do I just need to install a set of external lights like a rally car. I'm ok with that if that's the easiest solution to this problem.
Has anyone cut open the low beams and put a set of projectors into them? This seems like a lot of work to get it right, but preserves the stock look.
Bill W
 

Lvnmarks

quandoomniflunkusmoritati
Tony is your expert on this, assuming it's a gen one.

Allot of us have just gotten a nice set of LSC housings but it is possible to lay in new reflecting material.
 

ONLYTONY

New member
I can't figure what kind of lights he has. It says the high beams have a smooth surface, and low beams have lines to focus the beam. LSC's, and gen 2 have lines to focus both bulbs. Gen 1 base are both smooth, high, and low beams. Picture would help.
 

ONLYTONY

New member
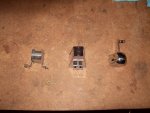
Difussers hdlts.jpgThese are what I call diffusers. There should be one of these in front of the low beam bulb. Without it, you'll light up the trees, houses, and everything but the road. Left=gen 1 base, middle= gen 1 LSC, right= Gen 2. Gen 1 base came in black. Projectors have been done on gen 1's. It takes a 2 1/2" unit. I purchased some LSC lights that had LED's. They had to be modified quite a bit to fit. Not a fan of LED's. They must get hotter than other choices. They have long heat difussers, or fans to keep them cool.
 

ranchodenieve

New member
It is a 1994. I will look for the metal diffuser, but I think that it is still there. You are right that it is a very important piece to keep in place.
If you turn the lights on and look in at an angle into the back of the light you will see the structure of the rear reflector. On the low beam, you will see a series of horizontal lines, while on the high beam it is a smooth surface. These horizontal lines scatter rather than focus the light on the low beams. I would like to install a smooth surface in the back of the low beams to improve their performance since high beams perform well with the smooth surface. Is it possible to open the housing up to do this?
Note. The LED light itself inside the headlamp housing does not generate any appreciable heat. What generates heat is the power supply for the LED on the back outside of the housing, but the fan acts to keep the circuit cool. The power supply circuitry must be kept much cooler than an incandescent bulb would be. They do run cold and won't heat up the housing.
Bill W
 

ONLYTONY

New member
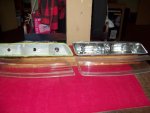
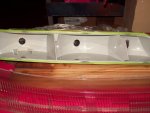
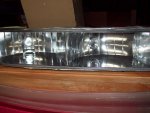
Gen 1 base & LSC open w lenses.jpgGen 1 base no chrome.jpgGen 1 LSC open, my paint# 2.jpgHDLT 2nd hsg.jpgNow we know you have a gen 1. Your lights have been worked on. On "base" on the left, the housing is smooth. Pic has chrome removed, and a "bubble" type lense. The LSC housing on the right, has vertical lines. No horizontal lines at all. In one pic it shows where I put chrome brite in horizontal lines. Look into the light using a flashlight.
 

ranchodenieve

New member
I stand corrected. My side walls have the horizontal striping like last picture. It appears that I have very small smooth back wall that is almost completely obscured by the filament guard. I now have a better idea about the optical design issues that we face from your images. I do need to do a much better job of polishing the lenses since the sun really got to them. I think that I may need to pull them out to do this. How easy is it to remove them from the car? I see that you have pulled the lenses off of the housing. How did you do that? I want to clean up the insides of the lenses. Eventually I think that I will need to upgrade to a better system, but I can't afford that now.
Bill W
 
Last edited:

ONLYTONY

New member
Sounds like you have base headlights. In the rear of the lights you'll find 3 metal clips that hold the lights on. Spread them and pull them out. Light slides right out. The lenses might be yellowish on the inside. Get a lense cleaning kit,(auto store, etc.) and do the outside first. A lot of guys like 3m kit. See what you have before complete tear down. Again with a flashlight peek inside, and see the condition of the chrome. If it's fair, install a HID kit, 6000K will work, and drive on, until your ready to upgrade. Opening the lights is a bit more work. I bake mine to loosen the glue.
 

ranchodenieve

New member
Thanks. I was hoping that they didn't glue them and disassembly was easier. I used the RainX polishing kit on them and it took most of the yellowing off, but it didn't do an exceptional job on the final polish. They may have yellowed inside too. I have a ultra fine buffing wheel that I use to repolish scratched CD and DVDs. They look new and are usually playable after proper polishing. I may take a look at the 3M kit before using the buffing wheel though. I think that I can do a better polishing job with them out of the car.
Bill W
 

ONLYTONY

New member
There is a coating on them. I start with 600 gritt wet sandpaper up to 14000 gritt, then start polishing. Your lenses get some yellowing inside mostly from heat, and old age. Taking them apart is a whole other project. What are you using for buffing compound?
 

ranchodenieve

New member
I am using something that is not readily available. I have a 0.20 micron diamond polishing paste that was left over when Syntex shut their contact lense manufacturing facility in Phoenix. We used to make contact lenses by hand on little lathes. This was used to polish the tool marks out of the turned contact lenses. That was why they were so expensive in the 70s; completely handmade. Now they are mostly directly molded with almost finished optical surfaces. You still have to be very careful because while it yields a perfect optical surface, it is also fairly aggressive.
Bill W
 

tixer

Lincoln Evangelist
I am using something that is not readily available. I have a 0.20 micron diamond polishing paste that was left over when Syntex shut their contact lense manufacturing facility in Phoenix. We used to make contact lenses by hand on little lathes.
This is fascinating. I guess I'd never given much thought to how contact lenses were manufactured, but on a lathe?? I'm impressed.
 

ranchodenieve

New member
I am at the last of my stuff and will need to look for more soon. This was specifically formulated to work on plastics. A few guidelines for looking for it since diamond polishing pastes are generally available for machining polishing of mirror finishes. Water soluble is good. Oil soluble will damage many plastics and you should avoid these formulas. You should test it on the outer non optic edges before proceeding to the optics since some formulas will mess up plastics by carrier absorbance. Test and wait overnight before proceeding.
Practice on a piece of Plexiglas or Lexan to learn the touch that you need to be successful. Since this stuff is fairly aggressive, a light touch is needed. Lower wheel speeds may be needed too and dedicate a new wheel for it only. Check your technique on the edges before doing the optics. This is like doing a test spray on scrap before working the car. The basic problem is that while the metal that many of these were intended to polish is malleable, these plastics are not. Rather they can be brittle below their glass transition temperature which is top of the best polishing temperature for them. At the glass transition temperature (~ 100C; Boiling water), the plastic transforms to a mobile state that relaxes it to a malleable state. Stay just below this temperature since when the plastic becomes a glass again, the surface may move unpredictably. Just over wrist warm like a baby bottle is a good indicator of proper polishing max temp. You want the plastic to be malleable, but not overly hot. But, seriously too hot and they melt which destroys the optical surface. And yes, you can polish past melt mistakes if you are patient. You do really want to avoid having to do this. This is why learning the touch is so important
Use a Plexiglas scrap to spread new stuff on the wheel before doing real polishing. A dab on the spreader stick is like using the conventional solid sticks to load the wheel with polish. Loose wheels are generally the best choice. Be patient and keep the wheel properly loaded with polish.
Note you can use some of the larger conventional compound wheels to take out major scratches and yellowing. Again, go slow and be careful. A misstep can fling your headlamp across the room and bad things will happen.
A DVD that your kids have scratched into unplayable also makes a good practice piece and they will be happy when it platys again!
Bill W
 
Last edited:

ranchodenieve

New member
After polishing your headlights by any method, you should finish them up by using the protectant from one of the polishing kits. This is an important step in preserving all of your hard work.
Bill W
 
Top