tixer
Lincoln Evangelist
I picked up a "new" winter car a couple years back, and in the process, lost my only tow vehicle. I wanted my hitch back, and the cheapskate in me thought it wise to try the installation myself.
After a bit of research, I decided upon the Reese Towpower 33047. It's a 2" Class III/IV Receiver, and available on Amazon (as of October 2014) for about $160
Here's the finished product - If you like what you see, keep reading.

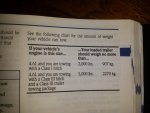
The guide on Reese's website claims this model fits every full-size ford from 1979 to 2014. They also go on to say that for 1985 and newer, you need to buy four extra "spacer blocks." You don't. The kit I ordered included all hardware, including two of those blocks, which was all I needed.
You won't need much for tools, but Here's the list.
-3/4" deep socket
-Extension
-Ratchet handle
-Torque wrench set at 75 Ft Lbs
-1/2" drill bit, and a drill with a chuck it will fit into.
-Ramps
-Your favorite jack (or two)
My first step was to test the fit and alignment by holding it in place with the jack. I apologize for the poor quality. I hadn't intended to use this, but realized it may be important. So here it is.

The two front holes lined up nicely with the existing holes in the frame, clearance looked good all around, so I left the hitch in place, secured by the jack, and went fishing.
the front two bolts go inside the frame via the body mount holes, and are pulled through a different set of holes into the hitch, about 4" away. The kit came with an ingenious little fishing tool. Just thread the bolt into the "spring," then run the other end of the wire into the frame, and out through the hitch. Easy breezy.

I installed both forward bolts, nuts, and washers, but left them quite loose. I then dropped the jack and tested alignment again.
Since the front holes in the frame are actually oblong, I tested for alignment with the hitch pushed all the way forward, and all the way back. I decided upon all the way back.
It was at this point that I noticed that something wasn't quite perfect. the surfaces of the hitch wouldn't quite sit flush against the frame. Either the hitch itself was slightly bent, or maybe assembled to poorer tolerances than I would have expected. (Or my car's frame, was slightly bent.)
Regardless, with the hitch pushed up against the frame, the rear hole on the driver's side would sit flush, but the passenger side had maybe a 1/2" gap. After quite a bit of fiddling and adjusting, I decided that nothing could be done for it, and moved on. If you encounter this, I suggest you move on more quickly than I did. It'll all work out fine.")
I slid the two rear spacer blocks into place between the hitch and the frame, then used the jack once again to hold the hitch up against the frame of the car. This time I did so only on the passenger side, to try to minimize the aforementioned gap.
Time to drill those two 1/2" holes. - Since my own tried and true Bosch drill could not accommodate my 1/2" bit, I had to bust out my secret weapon. Regrettably, my secret weapon is single speed only, and heavy. This is where Jack #2 comes in handy.

This solution worked beautifully.
With the holes drilled and the hitch still held in place by the jack, it was just a matter of fishing the two remaining bolts through the new holes. I did this by hand, as these holes are far closer to the body-mount access points than the forward ones were. In hindsight, the fishing tool may have proved useful here too. I did have to put the upper "block" in separately from the bolt, due to space concerns, And they only fit one way. You'll notice they are drilled off-center. Use that to your advantage.

As for that fitment issue on the passenger side. I still had a gap to work with here, but I noticed that I had just enough of the bolt exposed that I could put a flat washer, and the nut on, and catch enough of the thread to start. I cranked this up to the frame, and put a "C" clamp between the frame of the hitch and the frame of the car. This held it in place well enough that I could get the nut back off, install the lock washer, and tighten it back up again.
I then double-checked the alignment of everything, and torqued everything to 75 ft lbs, as instructed in the manual.
After a bit of research, I decided upon the Reese Towpower 33047. It's a 2" Class III/IV Receiver, and available on Amazon (as of October 2014) for about $160
Here's the finished product - If you like what you see, keep reading.
The guide on Reese's website claims this model fits every full-size ford from 1979 to 2014. They also go on to say that for 1985 and newer, you need to buy four extra "spacer blocks." You don't. The kit I ordered included all hardware, including two of those blocks, which was all I needed.
You won't need much for tools, but Here's the list.
-3/4" deep socket
-Extension
-Ratchet handle
-Torque wrench set at 75 Ft Lbs
-1/2" drill bit, and a drill with a chuck it will fit into.
-Ramps
-Your favorite jack (or two)
My first step was to test the fit and alignment by holding it in place with the jack. I apologize for the poor quality. I hadn't intended to use this, but realized it may be important. So here it is.
The two front holes lined up nicely with the existing holes in the frame, clearance looked good all around, so I left the hitch in place, secured by the jack, and went fishing.
the front two bolts go inside the frame via the body mount holes, and are pulled through a different set of holes into the hitch, about 4" away. The kit came with an ingenious little fishing tool. Just thread the bolt into the "spring," then run the other end of the wire into the frame, and out through the hitch. Easy breezy.
I installed both forward bolts, nuts, and washers, but left them quite loose. I then dropped the jack and tested alignment again.
Since the front holes in the frame are actually oblong, I tested for alignment with the hitch pushed all the way forward, and all the way back. I decided upon all the way back.
It was at this point that I noticed that something wasn't quite perfect. the surfaces of the hitch wouldn't quite sit flush against the frame. Either the hitch itself was slightly bent, or maybe assembled to poorer tolerances than I would have expected. (Or my car's frame, was slightly bent.)
Regardless, with the hitch pushed up against the frame, the rear hole on the driver's side would sit flush, but the passenger side had maybe a 1/2" gap. After quite a bit of fiddling and adjusting, I decided that nothing could be done for it, and moved on. If you encounter this, I suggest you move on more quickly than I did. It'll all work out fine.
I slid the two rear spacer blocks into place between the hitch and the frame, then used the jack once again to hold the hitch up against the frame of the car. This time I did so only on the passenger side, to try to minimize the aforementioned gap.
Time to drill those two 1/2" holes. - Since my own tried and true Bosch drill could not accommodate my 1/2" bit, I had to bust out my secret weapon. Regrettably, my secret weapon is single speed only, and heavy. This is where Jack #2 comes in handy.
This solution worked beautifully.
With the holes drilled and the hitch still held in place by the jack, it was just a matter of fishing the two remaining bolts through the new holes. I did this by hand, as these holes are far closer to the body-mount access points than the forward ones were. In hindsight, the fishing tool may have proved useful here too. I did have to put the upper "block" in separately from the bolt, due to space concerns, And they only fit one way. You'll notice they are drilled off-center. Use that to your advantage.
As for that fitment issue on the passenger side. I still had a gap to work with here, but I noticed that I had just enough of the bolt exposed that I could put a flat washer, and the nut on, and catch enough of the thread to start. I cranked this up to the frame, and put a "C" clamp between the frame of the hitch and the frame of the car. This held it in place well enough that I could get the nut back off, install the lock washer, and tighten it back up again.
I then double-checked the alignment of everything, and torqued everything to 75 ft lbs, as instructed in the manual.
Last edited: