Disaster strikes

That's really terrible Marc! Your car is gorgeous! Hope the worst is over and it takes minimal work to get those seats working again. :(
 
Thanks for the encouragement everyone. Just for an update, I hadn't realized there was a separate pair of 30A fuses in the engine compartment for the seats. One of the fuses in the instrument panel was blown so I was hoping this would be the answer. Unfortunately they weren't blown, so I'm back to square one.

I've been too busy with work this week to get the car over to Mike and Sharon's, but I'm hoping this weekend might work. I'll bring the voltmeter and go to work tracking down the problem. The fact that they still aren't responding after five days of drying out doesn't make me very hopeful. Anybody know if the harnesses might have fusible links in them? It's just strange that not a single control works on either seat. I could see one or two motors burning out but not all of them. Seems I'm simply not getting power to them.
 
Actually I'm looking at the pinpoint test procedure now and it does mention another fuse inside the seat module. Jeez, how many fuses do these things need? lol
 
Just noticed I spelt your name wrong before... Sorry :eek: I got used to spelling it like that since I work with a "Marc"

Good luck with the diag!
 
Update on the seats. The wiring harnesses are a complete loss. Green corrosion all over the connectors and some of the wires have actually broken. We were only able to get the drivers seat out, the passenger seat is all the way back and the rear studs are about six inches forward of the rear of the seat. Considering the damage to the drivers side, I may just rent a sawzall and cut the passenger seat track apart to get it out. The damage has already been done, so I might as well bite the bullet and replace both tracks along with the harnesses. Oh yeah, and it was hot as a mofo today.

Fun times! :D

(Stupid camera wanted to focus on the carpet instead of what I was pointing at)

img_0166sm.jpg


img_0168sm.jpg


img_0172sm.jpg


img_0173sm.jpg
 
I know what you're thinking, and I agree.

The storm supposedly hit around 2 AM last Saturday morning, and it sat for most of the day with about an inch of water in it before I found the damage. So maybe 13 or 14 hours. Then a week with the carpets damp. That still doesn't seem like enough time to do all that damage. Obviously there's been moisture in it before, as that rust on the motors isn't new. I've gotten a little bit of water in the passenger side after heavy rains due to the cowl vent leaking but it was never too bad. Yes I know I should have fixed it. But it doesn't explain the drivers side. I've never noticed it wet before.
 
Last edited:
Why cut up the seat when you can just take off the bottom cushion like Jeremi suggested? It's not hard at all......some "C" rings and some plastic channels to unclip and just pull it off.
 
To take out my frustrations?

But seriously, I need to get the plastic cushion tray out, the foam isn't going to be enough. The tray is sitting right over the rear studs. Problem is I'm not yet familiar enough with how it's put together to get it apart. After studying the drivers seat, I thought I could get the tray out by removing the four nuts on the bottom of it and one bolt on the inboard side. That last one is turning out to be the problem. Once I get it almost out, it's getting tighter and I'm not sure why.

I'm going to give it another try tomorrow. If I can't get it out, I'll leave the thing in and we'll deal with it in a few weeks at Jeremi's. We're gonna be pulling the dash among other things, and since the harness is destroyed, that can be replaced then as well. Like I said, the damage is too severe to save much, so there's no point any more in pulling it out until I get replacement parts.
 
Getting the seat out is easy, I just had to do it today because I pulled the engine out of my parts car yesterday and forgot my driver's seat was still in the car, and all the way back.:D

Get a 3/8 drive, swivel 18 mil socket (I only had a 6 point 19 mil but that worked) pull the console and check the photo below for placement. Then, remove the plastic peice that holds the switches, just move it out of the way, no need to remove switches, and use a 13 mil swivel socket for that one.:)
 

Attachments

  • w1.JPG
    w1.JPG
    74.4 KB · Views: 0
  • w2.JPG
    w2.JPG
    60.3 KB · Views: 0
  • w3.JPG
    w3.JPG
    41.1 KB · Views: 0
Last edited:
We got the drivers side out. But no worries mark. I have a sawsall and took your cue. The passenges seat is removed.
 
We got the drivers side out. But no worries mark. I have a sawsall and took your cue. The passenges seat is removed.

Or you can do it that way.:)

I did mine early Sunday morning and was hoping I could post my way before it came to the sawsall, but my power was out since 10:00 the night before and I couldn't get online. :frown:
 
It must be that time of year. I just pulled the seats from the parts car before it goes away. :wink:
 
(Sorry, no pics this time. I forgot the camera at home)...

We finally managed to get the passenger seat out today without cutting it up. Thanks Bill for the tip on using the swivel sockets. $25 each hurt a lot though. :eek: We had to use both Jeremi's and Bill's suggestions. I got the plastic tray unbolted from the frame, although it was still attached in the back somewhere. Anyway, I pulled the front of the tray up while Mike got to the nut. Bill, I'm a bit confused as to how you got to that particular nut. Your pic shows it on the outside of the track but the one on the passenger seat was on the inside of the track. Different on DS vs. PS? Anyway we got it out.

Surprisingly, the harness on the passenger seat was in MUCH better shape than the drivers side, although it still had a bunch of green fuzz inside the connector. No broken wires this time. Once we got it out of the car and turned it over upside down, there was a pretty good trickle of water coming out of the motors and electronics. So it's probably still not worth trying to fix.

I'm going to check to see if I can get ahold of new pins for the plugs. If I can, then I may try to replace them rather than replace the entire harness or splice in another plug with heat shrink. Obviously I'll lose a half inch or so on the harness but it should be OK.

The carpet came out and was still absolutely dripping from the padding. The floor pan had about a quarter inch of water in the low spots. We opened up the plugs in the floor and I soaked up everything I could with towels and it's drying. Thankfully, no rust was seen. However, the liner on the firewall was soaked on the passenger side, which is obviously coming from the cowl vent. I'll fix that tomorrow, but I'm not sure how to dry out the liner, as it looks like the whole dash has to come out to get it out. I've got a bunch of towels stuffed in behind it for now, but I don't see it getting dry without removing it.

I'm steering more and more towards just replacing the carpet. While I didn't see any mildew and the back and passenger side look practically new, the area around the pedals is just filthy and matted with that greasy brown stuff. I'll check around tomorrow and see if it can be cleaned. If I go with a new carpet I'll probably have it professionally installed so it's done right, with new padding and everything. It looks like the clip for the floor mat is just snapped together, so it should be able to be installed in the new one.
 
I checked the pass seat, it's the same, just a mirror image.

I put the socket on the nut first, then pushed the extension through, to it.
 
Well, the car is back together, sans carpet, and out of Mike and Sharon's garage. It took me a while to find a professional carpet cleaner who actually had a shop instead of a van, but I found a guy about 45 minutes away who does pure steam cleaning, as opposed to shampoo and hot water. I took it over today and he said it's perfectly salvageable. And for a bargain price too. Seems like a real cool guy. He's into cars and does interior restoration on the side.

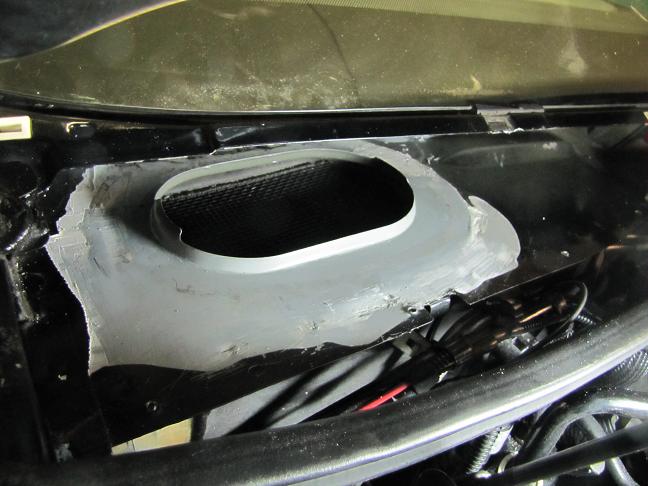
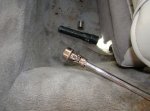
I worked on the cowl vent yesterday and I have to say that the fresh air intake is a BIATCH to get out. It had a layer of gummy sealant spread out about 2 inches on all sides. As I scraped it away it would come off in huge sheets, so I ended up taking off more than I ever needed.

img_0179sm.jpg


Here's what I wasn't expecting: The sheet metal has a 3/8" lip all around the opening. WTF? Can someone explain how water gets in the intake with that lip in place? I'll get back to this in a minute.

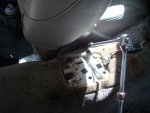
Anyway, something I noticed was that in the rear of the cowl "cavity" where the "floor" meets the firewall is a bead of sealant. It was very soft and full of tiny holes. That long gash on the left you see was where I pushed a gasket scraper into it. It's like playdoh.

img_0177sm.jpg


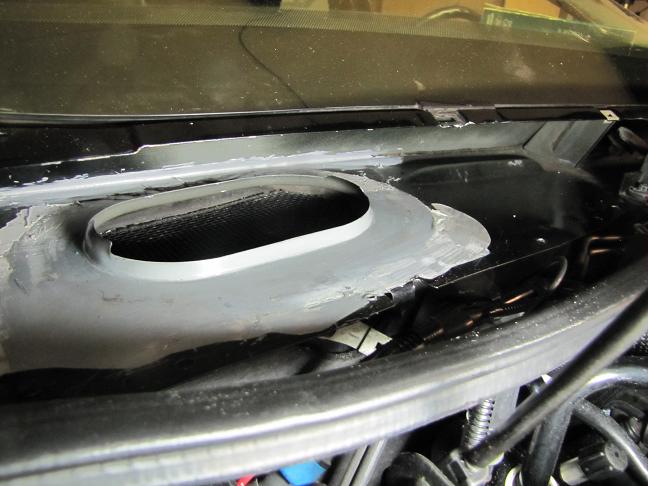
So I ran a bead of marine sealant along it. This pic is at the halfway point. I only went up to the center bracket for now, as I didn't feel like dealing with all the wiper motor crap. I'll deal with it when the engine's out of the car in a few weeks:

img_0174sm.jpg


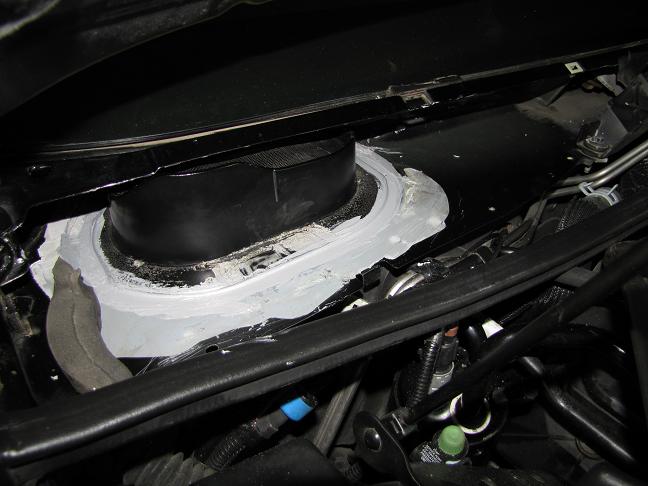
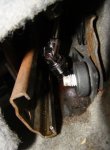
The fresh air intake back in place with sealant glopped on it. The next day I painted the area black to cover any bare metal I might have scratched through when removing it. And to make a completely invisible part of the car more presentable. :wink:

img_0181sm.jpg


So back to the cowl leaking issues... Ford used cheap foam weatherstripping on various parts, which was totally dried up and fell to pieces like a saltine cracker. I replaced the foam on the bottom edge of the forward "wall" piece on the passenger side. There is also a really cheesy hunk of foam on the outboard side consisting of two pieces of foam stuck together back to back and then glued to the metal (you can see it in the last pic above). It had come off and I'm going to go back and replace it as soon as I find some suitable weatherstrip.

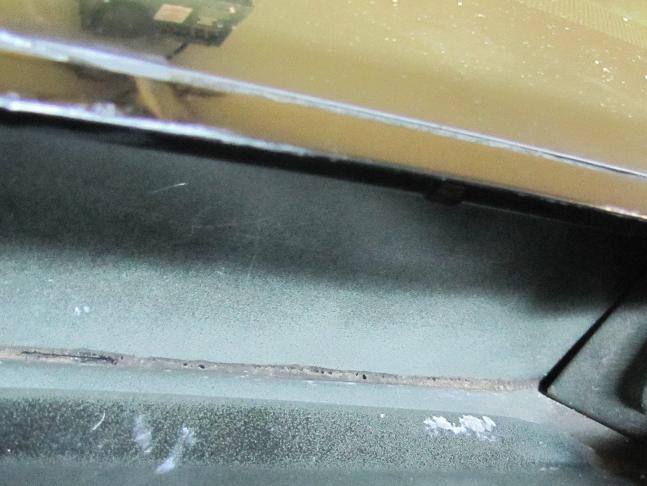
Here's the thing: With that lip in the sheet metal for the air intake, I couldn't fathom how water got in through the intake except right through the mouth. If the cowl panel isn't pressed down against the windshield, I could definitely see water running right down the windshield, under the cowl panel and directly into the intake. While looking at the underside of the panel, I noticed a foam strip running along the area above where the intake sits:

img_0184sm.jpg


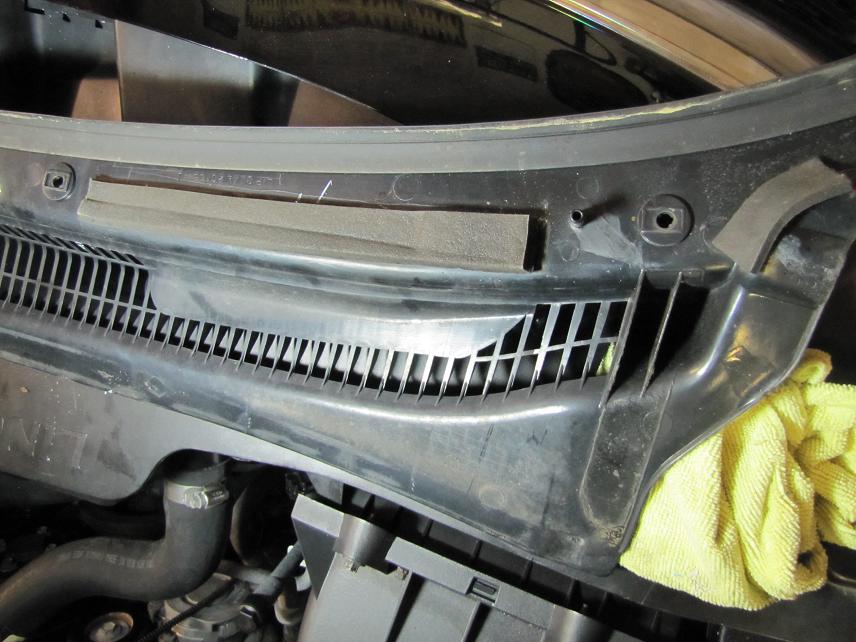
The foam sits on the lower windshield support/driprail/whatever it's called, and its purpose is obviously to block water that gets under the cowl as I just described, and divert it off to the sides of the inlet. The ends of the foam were lifting up, so I suspect this is actually where it's coming in. I know this isn't news to some people, but it was to me. In any case, I think the proper solution would be to put on a new piece of foam and make it longer, along with angling the sides so it's narrower at the top. With a more pointed corner, water would tend to drip straight off instead of possibly running along the bottom of the foam. You know, surface tension and physics and all that. :wink: Anyway, that's next.
 
Last edited:
Back
Top