how to clean steering column potentiometer

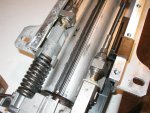
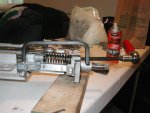
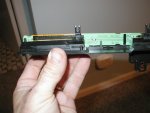
Next you have to remove the top cover. It is just 8 #30 torx screws. You can see my problem was that the bearing carriers were broken. The front of each one was broxen off. Plus the stop pin was broken on the cover. That was also replaced. The bottom pic gives a good look at the whole potentiometer.

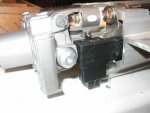
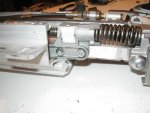
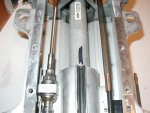
That piece of black plastic on the housing pulls off and is connected to the potentiometer.

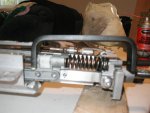
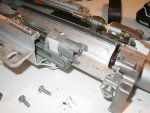
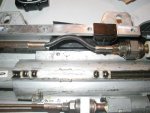
Next up is removing that spring on the left.
 

Attachments

  • P1010007.jpg
    P1010007.jpg
    60.1 KB · Views: 6
  • P1010008.jpg
    P1010008.jpg
    84.8 KB · Views: 4
Last edited:
Here is another look at the potentiometer. This the front part that tracks the tilt position. That black "U" connected to that little pin moves back and forth as you tilt the column.
 

Attachments

  • P1010009.jpg
    P1010009.jpg
    55.9 KB · Views: 4
Last edited:
on a quick note, after the motors are removed you can move the column in /out by turing this hex shaft. You tilt it by turning the other one.
 

Attachments

  • P1010010.jpg
    P1010010.jpg
    60.1 KB · Views: 1
Here is how to remove the spring. You need this special Rotunda tool #T97P-3D655-A. I borrowed this one from someone. It comes with a little cup tool on the threaded shaft but it is not used for this steering column. it would not be too hard to make one if you have access to a drill press or Mill. First, you have to fully extend the the column. Then slip the compressor on and tighten it finger tight. ONLY FINGER TIGHT.
 

Attachments

  • P1010016.jpg
    P1010016.jpg
    48.4 KB · Views: 2
Last edited:
Here is a better pic. I actually took these after I removed it because I remembered I forgot to take a pic.
 

Attachments

  • P1010017.jpg
    P1010017.jpg
    59 KB · Views: 2
The intent of only being finger tight is to hold the spring while these 2 torx screws are removed. Once these are removed you can uncompress the spring and remove it
 

Attachments

  • P1010011.jpg
    P1010011.jpg
    58.4 KB · Views: 1
Next step is to seperate the 2 halves. Naturally I forgot to take a good pic of this. I will add it later. Just grab the front portion where the steering wheel conencts and........PULL.
 
Now you can remove the potentiometer. There are just 2 screws to remove and it pulls off the housing. Then you have to carefully pry apart the plastic housing. It is the typical 2 piece snap together circuit board housing.

first you remove the 2 sliding contacts. They just pull off. Then the circuit board can be pulled out. I cleaned it with some isopropyl alcohol. You could also use contact cleaner. I imagine you could get away with a dry napkin. I forgot to take pics of it disassembled. The long horizontal strip is what you are cleaning. There is another one lower and not in view. I was suprised at how much "black" came off. I would guess it was wear particals removed after 10years of sliding. I relubbed it with some Deoxit l260NP contact grease. Contact grease is conductive. It was actually hard to find locally. Just mail order some. Deoxit also makes a sliding contact grease that is probably a little better than the regular grease. There are a few other brands of contact grease, but not many.
 

Attachments

  • P1010014.jpg
    P1010014.jpg
    51.1 KB · Views: 2
  • P1010015.jpg
    P1010015.jpg
    49.2 KB · Views: 2
Last edited:
Another pint I forgot is that you should mark on the shaft where the shaft flat for the steering wheel lines up. You need ot reassemble it in this position.
 

Attachments

  • P1010012.jpg
    P1010012.jpg
    67.4 KB · Views: 1
Before assembling I relubed the screw actuators with lithium grease. I also cleaned and relubed the splined shaft. Plus, I polished up and greased the hex shafts that slide through the motors.

Reassembly is just the reverse processes. When reinstalling I think it is easier with a helper. When you recompress the spring everything wants to twist arround since the top is not on to contain everything. I tried to do it myself and eventually stripped the screw holes for these 2 torx screws. I had to helicoil them. I held everything in place while the helper turned the spring compressor untill the holes lined up. There is also a bit of finessing to reinstall the bearing retainers and tracks. Make sure to test for full extension and tilt travel before reinstalling the motors. I think after doing this twice I could do the whole job in a 1/2 hr.
 
On another note, if the column is not working and/or you are getting a crunching noise when the column moves you may have this problem. This is the column that was in the red car. After I installed it a while back it intermittently "crunched" and had a jerky movement. It eventually stopped extending. I took it out last week and assumed it was another dirty potentiometer. Turned out that the spring shaft for actuating the tilt was totaly twisted and caused the potentiometer to disconnect at the mechanical connection. As a result it would bind up and not slide smoothly through the motor. I reconnected the potentiometer and reassembeld it. It still binded up so I got it in a position I liked and disconneded the motors. This one will get replaced by the rebuilt one. I will eventually rebuild it but I need to get one of these spring rods. Everything else on the column is fine.
 

Attachments

  • P1010018.jpg
    P1010018.jpg
    73.5 KB · Views: 2
Last edited:
I also opened up the column speed sensor. This pic is for Mark. You could easily have a bad one on your car. Plenty of components on the bourd to fail. If any component failed the sensor would probably not send the correct signal to the controller. Swapping in another would be worth a try and would only take a few minutes. We could probably do it without removing the steering column.
 

Attachments

  • P1010022.jpg
    P1010022.jpg
    83.8 KB · Views: 2
Last edited:
Another option MArk Darrah told me worked for him was to get the cover off and remove the black plastic part on the housing edge. This connects to the potentiometer slidding contact. then just move the potentiometer back and forth a bunch of times to swipe away any dirt. Not as good as cleaning, but it may be your only option if you do not have the spring compressor or if you are not comfortable completely dissasembling the column.
 
Another option MArk Darrah told me worked for him was to get the cover off and remove the black plastic part on the housing edge. This connects to the potentiometer slidding contact. then just move the potentiometer back and forth a bunch of times to swipe away any dirt. Not as good as cleaning, but it may be your only option if you do not have the spring compressor or if you are not comfortable completely dissasembling the column.


If you can get a contact cleaner nozzle up there, couldn't you just spray it? Deoxite has a great cleaner.....Available in most electronics parts stores. Even Radio Shack has a decent cleaner. Lots better than running the slide back and forth....;)
 
you could, but you would also want to lube it somehow. It came from the factory with a grease. There are also spray contact lubricants. You could possibly spray some lube in there.
 
Nice write up!

I'll probably be looking at this sometime in the future with my 2 second gens.:D
 
Has anyone else cleaned the potentiometer before? How much effort did it take you to clean it? I have suspicions I may not have cleaned it enough. The power to the motor cuts out after about an inch of extension.
 
Back
Top